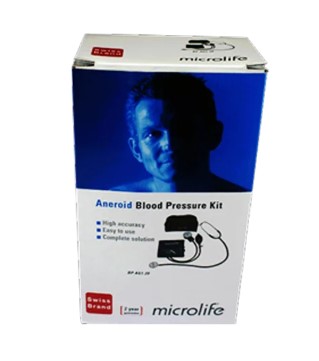
Aneroid Blood Pressure Kit – BP AG1-20
Original price was: 1,500.00৳ .1,400.00৳ Current price is: 1,400.00৳ .
SANOFI
Description
Aneroid blood pressure kit is a mechanical blood pressure measuring device for use on the upper arm and ensures you precise and consistent measurement. Blood pressure is the pressure of the blood flowing in the arteries generated by the pumping of the heart. Two values, the systolic (upper) value, and the diastolic (lower) value are always measured. Permanently high blood pressure values can damage your health and must be treated by your doctor! Always discuss your values with your doctor and tell him/her if you have noticed anything unusual or feel unsure. Never rely on single blood pressure readings. There are many causes of excessively high blood pressure values. Your doctor will explain them in more detail and offer treatment where appropriate. Besides medication, relaxation techniques, weight loss and exercise can also lower your blood pressure. Under no circumstances should you alter the dosages of drugs or initiate treatment without consulting your doctor. Depending on physical exertion and condition, blood pressure is subject to wide fluctuations as the day progresses. You should therefore take your measurements in the same quiet conditions and when you feel relaxed! Take at least two measurements per day, one in the morning and one in the evening. It is quite normal for two measurements taken in quick succession to produce significantly different results. Deviations between measurements taken by your doctor or in the pharmacy and those taken at home are quite normal, as these situations are completely different. Several measurements provide a much clearer picture than just one single measurement. Leave a small break of at least 15 seconds between two measurements. If you are pregnant, you should monitor your blood pressure regularly as it can change drastically during this time. The higher value is the one that determines the evaluation. Example: a blood pressure value of 140/80 mmHg or value of 130/90 mmHg indicates «blood pressure too high». 2. Using the Device for the First Time Selecting the correct cuff When choosing the correct size cuff the arm circumference should be measured at the centre of the upper arm. 22 – 32 cm (8.75 – 12.5 inches) should be the correct size for the majority of people. Only use Microlife cuffs. Contact your local Microlife Service if the enclosed cuff 2 does not fit. 3. Taking a Blood Pressure Measurement Checklist for taking a reliable measurement 1. Avoid activity, eating or smoking immediately before the measurement. 2. Sit down on a back-supported chair and relax for 5 minutes. Keep the feet flat on the floor and do not cross your legs. 3. Always measure on the same arm (normally left). 4. Remove close-fitting garments from the upper arm. To avoid constriction, shirt sleeves should not be rolled up – they do not interfere with the cuff if they are laid flat. 5. Always ensure that the correct cuff size is used (marking on the cuff). Fit the cuff closely, but not too tight. Make sure that the cuff is positioned 1-2 cm above the elbow. The artery mark on the cuff (ca. 3 cm long bar) must lie over the artery which runs down the inner side of the arm. Support your arm so it is relaxed. Ensure that the cuff is at the same height as your heart. 6. Any improper setup or damage to the stethoscope will cause distorted sound or poor sound transmission causing inaccurate readings. 7. Proper deflation rate is essential for an accurate reading. Practice and master a recommended deflation rate of 2-3 mmHg per second or a drop of 1-2 marks on the manometer 1 for each heartbeat. Measuring procedure 1. Place the chest piece 6 underneath the cuff 2 or 1-2 cm below it. Make sure the chest piece is in contact with the skin and lies on the brachial artery. 2. Plug in the ear piece 7 and check, if the chest piece is placed correctly, so that the Korotkoff sounds appear the loudest. 3. Close the valve 4 on the pump ball 3 by turning the screw clockwise. Do not over-tighten. 4. Take the pump ball 3 in your free hand (the arm you are not using to measure) and pump up the cuff. Watch the pressure indicator on the manometer 1 and pump up to approx. 40 mmHg higher than the expected systolic value (the upper value). Inflate to 200 mmHg if you are not sure about the expected value. 5. Open the valve 4 slowly by turning the screw counter-clockwise whilst holding the stethoscope chest piece 6 on the brachial artery. Listen carefully as the cuff begins to deflate. Note the reading on the manometer 1 as soon as you hear a faint, rhythmic tapping or thumping sounds. This is the systolic blood pressure reading. 6. Allow the pressure to continue dropping at the same deflation rate. Note the reading on the manometer 1 as soon as the thumping sound stops. This is the diastolic blood pressure reading. 7. Deflate the cuff completely. 8. Repeat the measurement at least two further times and record your values, date, and time immediately after finishing the measurements. 9. Remove the cuff and the stethoscope.





Reviews
There are no reviews yet.